This
project sprang
from this one little video I caught on youtube about 6 months
ago. It's essentially a 3d zoetrope
where the illusion of movement is achieved with the shutter speed
of the video camera instead of a strobe light or the slits of
a traditional zoetrope. The minute I saw these little guys passing
the parcel I knew I had to try this out for myself.
..
I decided
to email the guy who made this video, Jim
Le Fevre, to see if he could help me out and luckily
he turned out to be a top bloke who shares my willingness to
spread knowledge. Basically, he gave me the magic formula to
get it working, and saved me having to attempt a lot of horrible
maths, so I could just dive right in with the fun stuff. Thanks
Jim!
It still took a few goes to get it working though. Below is the very first version
I made - a peice of wood, going up and down. Exciting eh? It didn't work though
because for some reason I decided to completely ignore Jim's advice and used
the wrong numbers - 30 divisions of a 25cm diameter circle instead of 33 divisions
of a 30cm circle, which meant the animation slid around the circumference instead
appearing to be stationery. I think the mistake helped me grasp a deeper understanding
of the technique though, and made me think about why it had gone wrong.
I tried this first test out with a couple of VJ-ing mates, as I thought it would
make a nice live video feed to mix up with other stuff...
I was still
srtuggling to get my head around the idea of working in 33 frame
loops though, so I copied Jim and did some tests with drawing
pins, just to help me figure it out. I had to film these with
a stills camera though as I had no access to my brother's fancy
DV camera yet, so these are stop motion.
Filming
this frame by frame lead me down a slightly different path for
a while and it got me thinking about how I might incorporate
the record player technique into a film, and how I might come
up with different applications for the spinning, rotating movement.
This explosion test was also done using the record player and is also stop motion,
but I had an idea of how this might also be developed later using the 3d zoetrope.
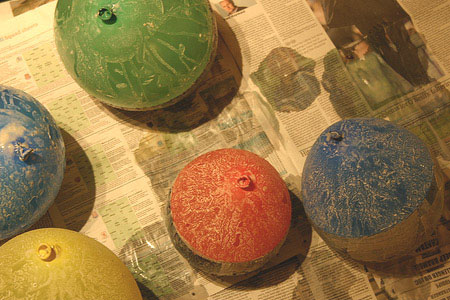
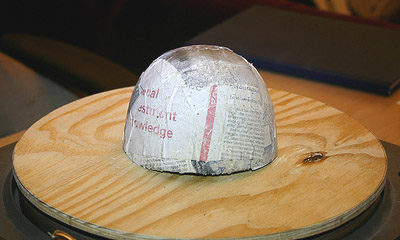
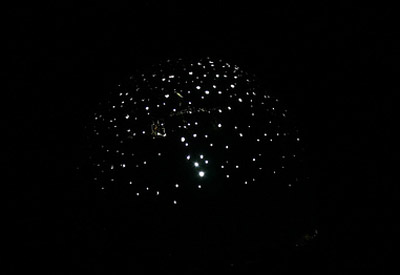
I made some paper mache domes and pricked lots of little pinholes in them, painted
them black, shone a light from inside and animated them rotating on the turntable,
just to see what I could do with them in After Effects really...
.....
......
......
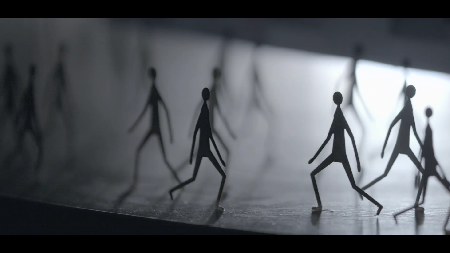
After
this little detour (which took longer than you might think),
I finally got around to figurnig out the 3d zoetrope properly.
I decided to keep it simple and did a really basic arc loop in
After Effects so I could just print the frames straight onto
acetate and they'd be exactly the right length for the circumference
of the disc - all I had to do was stick them onto the edge of
the wood with blutac. And it worked! Woo!
It's
a really good feeling when you get this working properly for
the first time, there's just something magical about seeing animation
happen right in front of your eyes. Although, strictly speaking,
it didn't actually happen right in front of my eyes because the
display on the camera I was using wasn't deinterlaced and was
just a big blurry mess until I took the footage into FCP. Yet
another bit of the learning curve scaled - I didn't twig that
this would be the case until I'd spent a good few hours despairing
that I'd never get the bloody thing working.
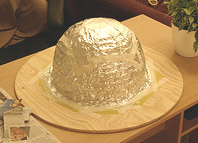
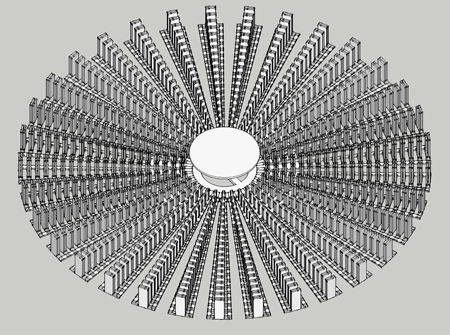
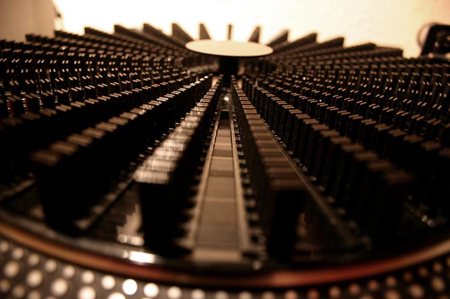
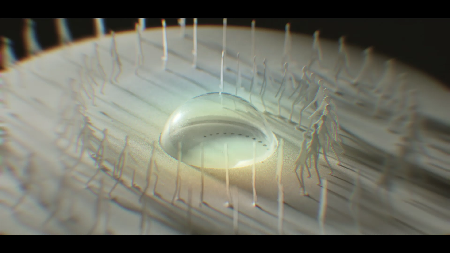
The next step was to combine the paper mache dome idea I'd done before, with
the 3d zoetrope. Construction of the giant nipple commenced!
.......
...........
This is the first test run of the big dome I did, just to make sure it was working
properly. (The reason the lighting is so poor, by the way, is because I had yet
to realise that I could adjust the settings on the camera to allow more light
into the shot - the high shutter speed needed for the effect to work shuts out
most of the light, especially if it's artificial, so I had to use a torch).
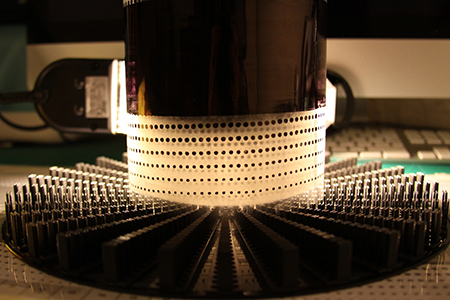
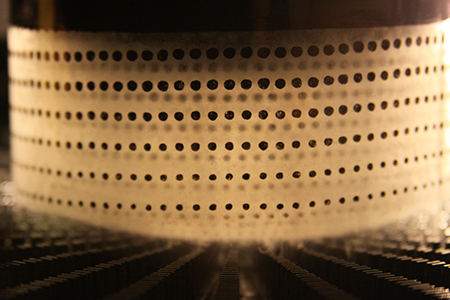
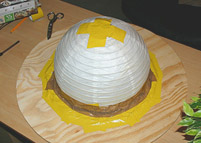
And finally, this is where I'm at now. I needed to shoot this during daylight
hours so I'd have enough light to film with the high shutter speed, so the dome
had to be painted black on white and then inverted in post. Some of these shots
are layered up in After Effects, but they're mostly pretty close to the original
footage, no extra animation added or anything, just a few glow effects and some
colour correction.
I'm
pretty confident with the technique now, and I'm applying for
funding from the Scottish Arts Council to hopefully develop these
ideas further.
31/01/10 - Mock-Ups
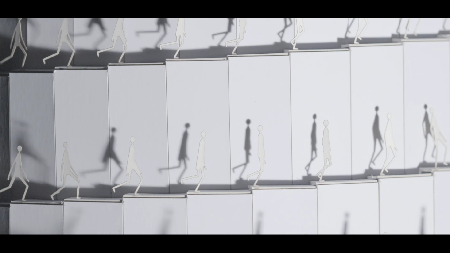
Some
mock-ups of my next 3D Zoetrope tests (please view them in fullscreen
so you can see them properly), you just need to imagine the whole
videos printed out and joined end to end so they form cylinders.
The first is based on a grid system - I split the length of the
cylinder into the 33 frames required of the zortrope, then split
them into equal parts, each frame being 6 squares in length (although
I'm working on a version that'll be 12 per frame). Then I just
used Photoshop to colour in the squares, and sequenced them in
After Effects.
It's all a bit random and cheesey at the moment but I think it has potential,
especially if I layer up a few more grids behind it and sort out the colours,
maybe simplify the movements quite a bit. This next one is using multiple layers,
and again will be printed out to form a cylinder. I was trying to keep this one
simple, but I think I'll test out the grid one first cos it's a bit more interesting
and less fiddly to put together...
These
will hopefully lead to some sort of instllation in the near future,
and l should have some footage of it in action soon.
23/07/10 - Cloud
Test
I was just looking through some old files and came across this failed attempt
at a floating zoetrope. It's pretty close to working though, so I think my next
test will be to use slightly heavier objects like beads or something to weigh
the 'frames' down properly, and I'll need to adjust the lengths of the threads
so that they come out to the correct circumference once it's spinning... I'll
hopefully have something to show relatively soon.
12/08/10 - Zoetrope
Beads
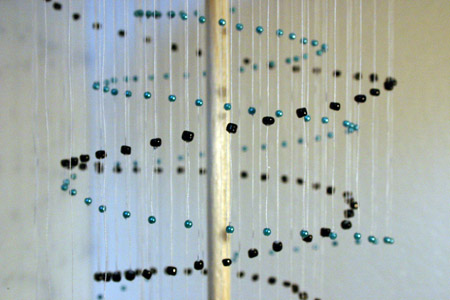
Here's that bead test I said I'd do - and it worked! The next test is to try
something a bit more complicated with it - I'm gonna have two beads on each thread
in a spiral formation so that one set travels up and the other goes down. It
will be fiddly :D
11/10/10 - Zoetrope
Beads Again
My latest zoetrope test. This one took bloody
ages but I'm pretty happy with the result. Although I could probably
have got some better footage if I wasn't so impatient. I really
want to figure out how to exhibit these - they're much more impressive
when you see them in the flesh. My next mission will be to combine
some sort of zoetrope with the projection mapping technique.
Could be interesting...
10/12/10 - Zoetrope
Mapping
I did this little test a while ago but wasn't in a rush to put it up due to it's
complete failure, but I reckon it's important to report on these things, if any
progress is to be made :) I was attempting to match up the projection so it was
constantly completely in line with the pieces of wood. Unfortunately it's very
hard to actually get the projected animation and the spinning zoetrope to line
up with each other in the first place, and even if you do manage it, the two
gradually slip out of synch because the maths of the whole thing just isn't accurate
enough...
It was worth a go though, and I think I'll continue with some projection experiments
on future zoetropes, but with more general masking off of larger areas as opposed
to
precise,
single
frames.
05/01/11 - Zoetrope
Developments
I've been working away on a new zoetrope over christmas that will look a little
bit like this mock up, only made from balsa wood. It's taking a lot longer and
is more complicated than it looks (as usual), but I'll hopefully have it done
in a few days.
I also got this lovely record by music and animation duo Sculpture for
christmas. Not only is it a really good album of experimental electronic type
music, but
it's also a zoetrope! Buy it here,
if
there's any left.
13/01/11 - Zoetrope
Sine Waves
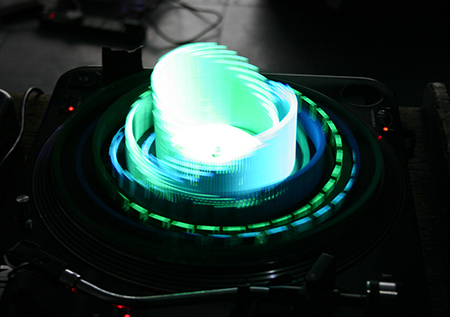
Here's some footage of the finished sine wave zoetrope - I plan
to make some sort of music video or VJ mix while projecting onto
the zoetrope next, so it's
not really completely finished yet.
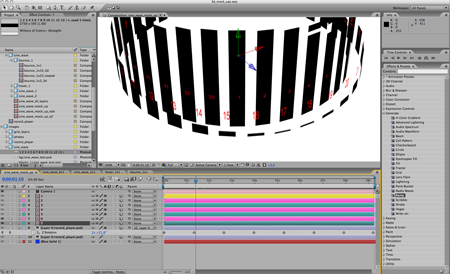
I thought I'd go into the process a bit behind this one while
it's still fresh in my head. It all started off in the computer
with photoshop and after effects
and the mock up which you can see above in my previous post. I won't go into
the details of how I made the the mock up (that'd be boring), but it was used
to make sure of the timings and positions of each of the pieces of wood before
I went ahead and made the real thing. Each frame of each circle was rendered
from the AE mock up as an image sequence and then printed out to use as reference
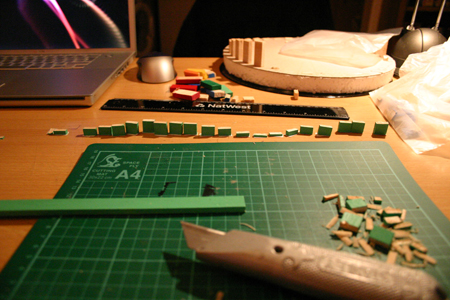
for when I started to chop up the wood.
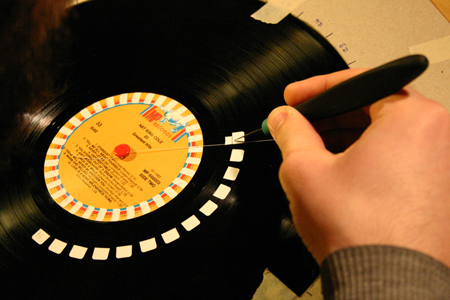
Each piece of wood, after it was painted, was lined up next to
it's corresponding print out, cut off and then numbered on the
bottom and bagged up with all the
other pieces from the same circle. After all 227 bits were done, I had to figure
out how to position them on the record without permanently marking or damaging
it.
After a bit of thinking, my solution was to mark the position
of each piece with a sticker (pretty clever eh?). But because
each of the circles was offset I couldn't
just mark out one circle, stick the wood on and move on to the next one because
the previous circle would get in the way - they all had to be done at the same
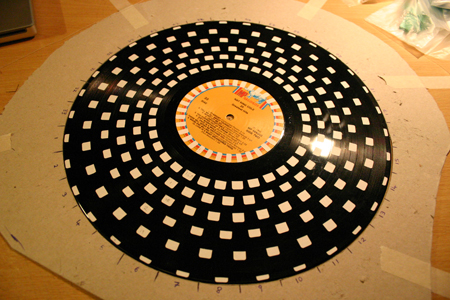
time. So I made a kind of guide circle with the 33 frames marked out for the
record to sit in, taped it in place and put a drawing pin in the middle that
I tied a piece of thread around.
I then stuck one sticker onto the thread at the required distance
from the centre of the disc, stretched it out to the right frame
number on the circumference
and then put a sticker on the record next to marker on the thread. Once they
were all done I tested their positions by filming it, and it worked - first time!
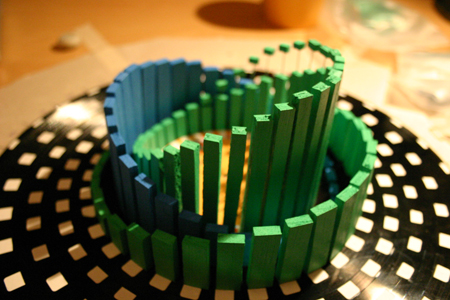
So
that was it really, I just went ahead and stuck the pieces on with my trusty
glue gun. I'm really happy with how this one turned out and I'm glad I kept pushing
myself to keep it really precise and tidy and slick, although not perfect, obviously.
My new record player has three speeds and allows me to fine tune the rpm with
a slider, so I was able to change the direction the animation drifts in and mix
it up a bit as I was filming which makes it a bit more interesting to look at
I think. But like I say, I'm going to do some more filming with this and have
a bit of a play with projection and masking off or highlighting certain areas
of the zoetrope...
12/03/11 - Battles
- IPT2 - 3D Zoetrope Mapping
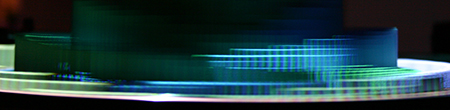
My latest 3D Zoetrope experiment, combining the sine wave zoetrope I did a few
weeks ago with some projection mapping, and IPT2 by Battles - here's what happened...
Pretty straightforward technique really - I just had a projector set up on a
tripod, pointing down at the zoetrope from above, and then masked off each circle
and spent a few days synching it up to the music. It's good to finally get some
sort of finished film out of this zoetrope malarkey :)
18/03/13 - IPT2
Projection Animation
I uploaded this to vimeo a while ago and forgot to post it here. It's the original
animation that was projected onto my balsa wood 3D Zoetrope for the IPT2 Battles
music video.
You can make out the seperate circles pretty easily here - these are the shapes
that I mapped out first of all, projecting the after effects composition onto
the zoetrope as I was doing it. All I did then was figure out what colors and
patterns worked well and then synched up the transitions with the music. I kind
of like how something so shitty looking is so completely transformed when it's
projected onto it's intended surface - without that, it's a pretty embarrassing
piece of animation :)
11/02/13 - 20 Layers Of
3D Zoetrope
It's been a while since I've posted anything, but I've been busy over the last
couple of months trying to push the zoetrope stuff forward while I had some spare
time. This is the first quick test of the new system that I just filmed, trying
to create an overall parent shape and movement before focusing in on the individual
surfaces of each layer...
So I decided a while ago that I wanted to construct some sort of base that would
allow me to accurately place multiple layers of animation in the zoetrope, and
after quite a few false starts with various laser cutting, CNC routing and aqua
cutting companies (all
of which said my plans were too delicate for their machines), I finally arrived
at 3D printing as a solution.
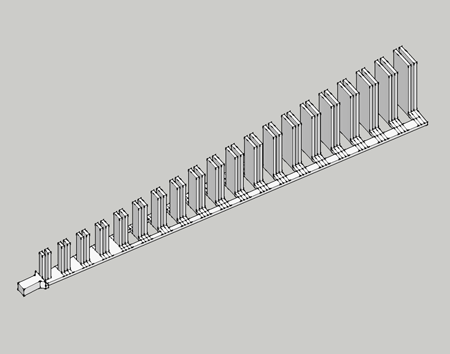
This is the final design, in Sketchup, that was printed by 3D
Creation Lab. After a couple of re-designs (mainly to get the cost
down, as the price is based on the volume of the material being printed) I decided
to go for this modular approach, which allows me to replace any of the 33 'spokes'
that plug into the central piece, should they break.
And ^ here's ^ the actual base - I'm pretty happy with it, even though my massive
hands do find it a bit tricky and fiddly to insert all the layers. I'm just trying
out various designs for now to determine the best materials to use and how far
I can push them with regards to height and weight etc. and I'll be playing about
with transparencies and printed animations on each of the 20 surfaces as well.
29/04/14 - I Have Been Working On Stuff, Honest
Bloody hell, it's nearly a year since I posted anything! It's been a busy year, it's just I've not really done much I've felt belongs on the site for one reason or another.
I've worked on a couple of projects for Norwich Puppet Theatre, both of which were really good fun, but I totally failed to capture any footage of the shows that would do them justice, and the animations just wouldn't make sense on their own, out of context. And the same goes for the two or three jobs I've done for dance company Smallpetitklein. I should get my act together really.
Anyway, I have been slowly but surely plugging away at my latest zoetrope effort in between jobs, so I thought I'd stick a few images and a video up here for anyone who's curious.
This is the mock up I made in After Effects, so in theory the final thing should look something like this.
Having filmed just the few layers in the images below, I'm a bit scared that I'm going to have some major issues when it comes to lighting this thing. The
parts of the acetate that I've roughened up with sand paper are possibly too opaque, so I've stopped that part of the process for now until I've got all the layers in place to see how they work together. I'm hoping that a strong enough back light in combination with some projection from above will solve any issues, but I'm not overly optimistic. This could end up being a rather time consuming lesson to learn...
Fingers crossed though, I'm sure I'll sort something out. I have plans to collaborate with a sound designer mate on this one, so keep an eye out, should have something to see before the year is out.
06/11/14 - Cardboard Quickie
It looks like I'm going to be taking part in an exhibition in Paris next year (more on that as it happens), involving some sort of zoetrope set up, so I wanted to start thinking about the sort of thing I might do for it. The 20 layer stuff I've been playing about with (see previous posts) is far too flimsy to be carting across Europe I think, so I need to come up with something more sturdy for the trip. I put this cardboard thing together without too much thought, over a couple of weeks I had to spare recently.
It has the usual problem of the central parts not really working properly and it doesn't really work well when the whole object is in view (hence the series of close up shots in that video), but I like the pulsating movement and the flickering colours. I've already got more ideas on how to take this approach forward, possibly inviolving a laser cutter for more intricate stuff, if I can get access to one.
Here's a Photoshop mock up.
11/11/14 - BYOB - NeoN Closing Party
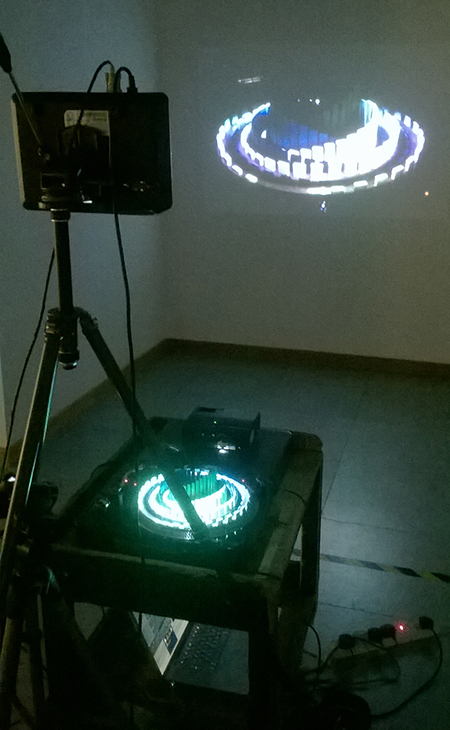
Another tentative step towards the Paris exhibition next year, I tested out a zoetrope in public for the first time the other night. BYOB (Bring Your Own Beamer) was this year's closing party for the NeoN digital arts festival in Dundee, and they put out an open call for people bring their stuff along to project. I was really just interested to see how it would work in an exhibition-like space, how people would react to it, would they get what was going on, would there be too much going on, would it just look good and make sense etc etc.
Here's the set up (no decent video unfortunately, as my camera was providing the live feed for the wall projection).
It's basically the same as the IPT2 video, but it was all happening live in the space.
I think it actually worked really well and is probably the best way to present the zoetropes, as it's all laid bare in front of you so it's easy to make the connections and understand what's going on, as opposed to the videos I post online, which I think require too much of an explanation of the processes behind them. Looking forward to coming up with something fancy for this exhibition now :)
13/04/15 - That Zoetrope I've Been On About For Two Years
Here it is! This edit's been sitting around twiddling it's thumbs for ages as I wasn't happy with it really, but what the heck here it is anyway. Might get around to doing sound for it one day, but I've said that before.
Ok, a bit more detail, if you insist. The idea for this one was to create this eerie, writhing object that could be viewed as a whole and that would reveal more detailed levels of animation as you got closer to it. This just didn't work, whether it was because of the materials I used, the density of the layers and ink or the lighting set up, I'm not too sure. However, I tried to salvage something from the footage so I ended up layering and compiositing it in after effects, with fairly interesting results I guess - I just don't really like doing that with these zoetropes because I feel it takes something away from the technique. Anyway, next one coming soon...
24/06/15 - Laser Cut Zoetrope
This is what I would've exhibited in Paris, had that gone ahead. It's the first zoetrope that I've not actually physically made myself, as you can probably tell. I designed it all in After Effects, Sketchup and Ilustrator and sent it off to the nice people at Flux in Glasgow to get laser cut and engraved in clear acrylic.
It looks pretty good under certain lighting conditions, but it's still not quite what I was after
- the circle animations are probably a bit too subtle and possibly too crowded, and I would've preferred a more solid look I think. Below are some of the mock ups I made...
I'm gonna give zoetropes a break for a bit now (there's another one in the works, coming soon), and make a music video or something.
25/02/16 - Integral Society 3D Zoetrope
My first paid zoetrope job! I'm not able to show any video of it yet unfortunately, but here are some stills from the collaboration with The Edge Picture Company and designer Garance Marneur.

 ..
..